Checkpoints in UFT(Part 4) - Page Checkpoint and XML checkpoint:
7. Page Checkpoint:
Page checkpoint is another variation of a standard checkpoint, which as the name indicates comes up when created on a Web Page.
It can be used for the following:
Open Google.com in internet explorer or any browser compatible with the current version of QTP you have on your machine. Record a new test in QTP, Select “Insert Checkpoint->Standard checkpoint” and point it to the google.com page. Then select the “Web Page” object from the object list displayed. The following dialog gets displayed:
7. Page Checkpoint:
Page checkpoint is another variation of a standard checkpoint, which as the name indicates comes up when created on a Web Page.
It can be used for the following:
- Checking links
- Sources of images
- Check for broken links
Open Google.com in internet explorer or any browser compatible with the current version of QTP you have on your machine. Record a new test in QTP, Select “Insert Checkpoint->Standard checkpoint” and point it to the google.com page. Then select the “Web Page” object from the object list displayed. The following dialog gets displayed:
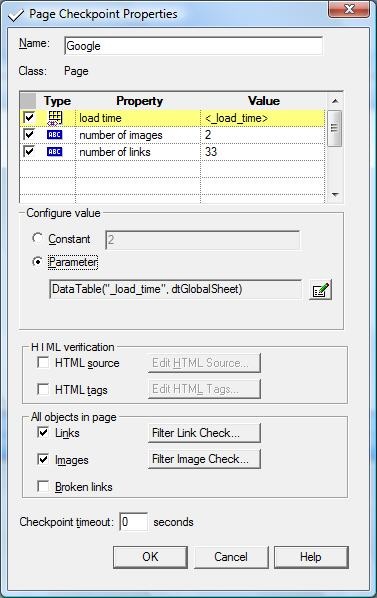
As you can see, the parameters that can be checked are in the list and proceeded with a checkbox with a check option. The users can choose number of properties as required.
As it is the case with all the other checkpoints we have seen so far, each of these properties can be a constant value or the user can parameterize.
– HTML source: Checks if the HTML code for the web page matches the actual one at run time. The user has an option to modify it as required while creating a checkpoint and check if it matches at run time.
– HTML tags: Checks the HTML tags for the web page at record and run times. As with HTML source, HTML tags can be modified too.
‘All Objects in the page’ section:
a) Links: On checking this, all the links are verified. To check only certain links the “Filter Link Check” can be clicked and the following dialog appears:
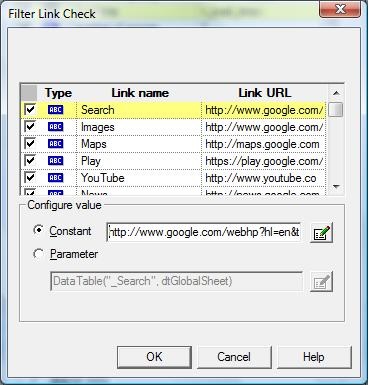
You can select the links or unselect them.
The link URL value again can be a constant or a parameterized value.
b) Images: Checking this ON means that you can verify the presence of the images on the page at run time. On clicking “Filter Image Check” the user can select the exact images that are to be checked and the ones that has to be ignored.
The following tab gets displayed when the user chooses to Filter:
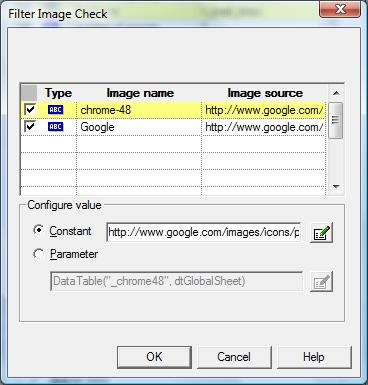
As usual, the user can configure the values.
c) Broken Links: This option is not usually ON by default and on checking it ON, it verifies if there are any broken links in the web page.
The user can check for broken links that are only for the same host as of the parent page. The relevant option has to be set in the following screen that can be launched by using “Tools->Options->Web” menu option.

Once this checkpoint is run all the failures, if any will be displayed the Test Results. Otherwise the checkpoint passes.
Some of the Page Checkpoint options are available only when the checkpoint is created during recording. If you try to create them from Active screen or Keyword view, the HTML verification options won’t be available.
To summarize the page checkpoint:
1) Useful in the web add-in while checking pages. Checks for the integrity of the pages.
2) A variation of a standard checkpoint, so all the rules of creation, editing and maintaining are the same.
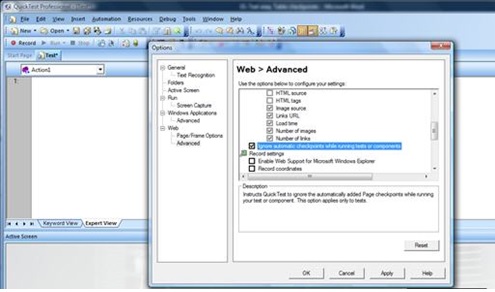
3) QTP can be instructed to put a checkpoint on every page. This can be done by choosing “Tools->Options->Web->Advanced” from the menu and clicking the option ON:
Some of the Page Checkpoint options are available only when the checkpoint is created during recording. If you try to create them from Active screen or Keyword view, the HTML verification options won’t be available.
To summarize the page checkpoint:
1) Useful in the web add-in while checking pages. Checks for the integrity of the pages.
2) A variation of a standard checkpoint, so all the rules of creation, editing and maintaining are the same.
3) QTP can be instructed to put a checkpoint on every page. This can be done by choosing “Tools->Options->Web->Advanced” from the menu and clicking the option ON:
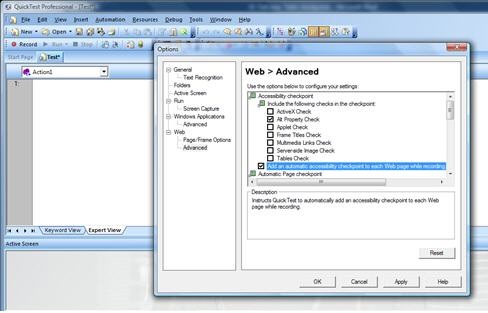
4) Alternately, you can instruct QTP to bypass automatic checkpoints. Select the following option in the same window that we launch in point 3.
8. XML checkpoint:
By adding XML checkpoints to your test, you can check the contents of individual XML data files or documents that are part of your Web application.
Step #1) While recording, select “Insert->Checkpoint->XML checkpoint( from application) option
Step #2) Select the page where you want to insert the checkpoint
Step #3) The following screen comes up:
By adding XML checkpoints to your test, you can check the contents of individual XML data files or documents that are part of your Web application.
- You can perform checkpoints on XML documents contained in Web pages or frames, on XML files, and on test objects that support XML.
- An XML checkpoint is a verification point that compares a current value for a specified XML element, attribute and/or value with its expected value.
- When you insert a checkpoint, QuickTest adds a checkpoint step in the Keyword View and adds a Check CheckPoint statement in the Expert View.
- When you run the test, QuickTest compares the expected results of the checkpoint to the current results. If the results do not match, the checkpoint fails.
- XML Web Page/Frame Checkpoint. Checks an XML document within a Web page or frame.
- XML File Checkpoint. Checks a specified XML file.
- XML Test Object Checkpoint. Checks the XML data for an object or operation.
Step #1) While recording, select “Insert->Checkpoint->XML checkpoint( from application) option
Step #2) Select the page where you want to insert the checkpoint
Step #3) The following screen comes up:
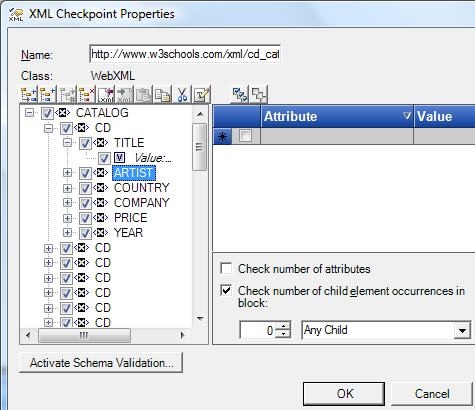
Step #4) Set the values as desired in this screen and click OK
Step #5)
Browser("Browser").Page("Page").WebXML("http://www.w3schools.com/xml/c").Check CheckPoint("http://www.w3schools.com/xml/cd_catalog.xml")
– This statement gets inserted
Alternately, if you need to insert an XML checkpoint on a file in your machine, you can choose the option:
“Insert->Checkpoint-> XML checkpoint(from resource)” and select the XML file test object.
The steps that follow are similar to the above ones.
The option “XML checkpoint(from application)” is available only when the web add in available and loaded for a certain test.
 RSS Feed
