Checkpoints in UFT
CheckPoints in UFT: -Checkpoints is used to do the verification in the application, where expected and current value is matched. If it’s matched then it returns true else it will return false.
Type of Checkpoints:-
1.Standard Checkpoint.
2.Image Checkpoint.
3.Bitmap Checkpoint.
4.Text Checkpoint.
5.Text Area Checkpoint.
6.Table Checkpoint
7.Page Checkpoint.
8.XML Checkpoint.
9.Accessibility Checkpoint.
10.Database Checkpoint.
1.Standard Checkpoint in UFT.
1) It is used to check the Property value of the object.
2) Compares the expected value with the actual value during runtime.
3) It can be set during recording or editing a test.
4) Active screen can also be used to insert this checkpoint. It is important that sufficient information be available in the active screen to be able to insert a checkpoint.
For Example: If there is a screen with, Login edit box, Password Edit box, OK, Cancel and Help buttons. We need to check if the Cancel button is visible. We are trying to achieve this by placing a checkpoint on the “Visible” object property of the Cancel button. While recording I performed a enter Login, enter password and click OK; and the setting on my active screen is to just store the objects I acted on and not the others, I will not be able to place the checkpoint on the cancel button because the active screen does not possess information about that object. Therefore, it is important for the active screen to have captured all the objects in the page and only then we can insert the checkpoint. I hope this explains what I mean when I say that the active screen should have sufficient information.
5) Once added, the checkpoint properties can be changed using the “Checkpoint Properties” dialog box.
6) Every checkpoint gets added to the local object repository when added. It can be moved to the shared object repository if needed.
7) Supported for all the environments as long as the appropriate add-ins are loaded.
8) Some examples of the objects that this can be used on are: web images, Edit boxes, static text, web tables etc.
How to insert a standard checkpoint while recording:
Step #1) Insert->Checkpoint: Select this option from the menu after starting a record session.
Step #2) – Clicking on this icon also results in the same thing.
Step #3) A list of relevant checkpoints applicable to the current or selected step on performing one of the steps listed in 1 and 2.

Step #4) Select the type of checkpoint. We will select “Standard” in our case.
Step #5) QTP interface gets hidden and the user can choose the object in the AUT over which the user wants to insert a checkpoint.
Step #6) Select the object and the following screen appears:
Step #5) QTP interface gets hidden and the user can choose the object in the AUT over which the user wants to insert a checkpoint.
Step #6) Select the object and the following screen appears:
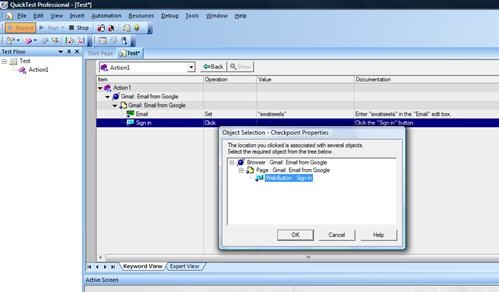
Step #7) Choose the object and click OK in the dialog. The checkpoint properties dialog box is displayed.

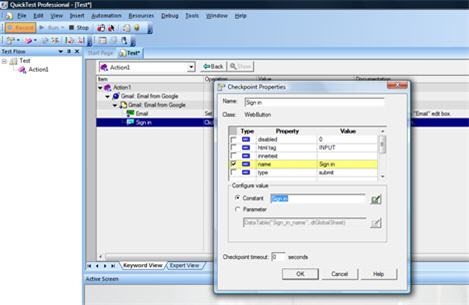
Step #8) Select the properties you want checked and click OK. I am going to choose just the name. As you can see above, you can modify the properties to to either a constant value or parameterize. There is also a timeout parameter that you can set. What this means is that, QTP waits for the particular number of seconds specified in this dialog for a certain Object to attain a property value before it performs the check.
Step #9) This is how I set the parameters and click OK.
Step #9) This is how I set the parameters and click OK.
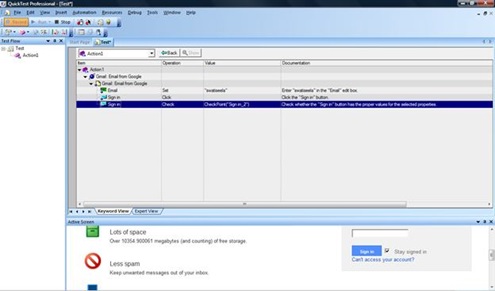
Step #10) This is how my checkpoint looks in the keyword view:
Step #11) In the expert view, the following code gets displayed:
Browser("Gmail: Email from Google").Page("Gmail: Email from Google").WebButton("Sign in").Check CheckPoint("Sign in_2")
How to insert a Standard checkpoint while editing:
1)Active Screen: In the active screen, right on an object and select the option to insert standard checkpoint. After that, follow the same steps as above to insert a checkpoint. (click to enlarge image)
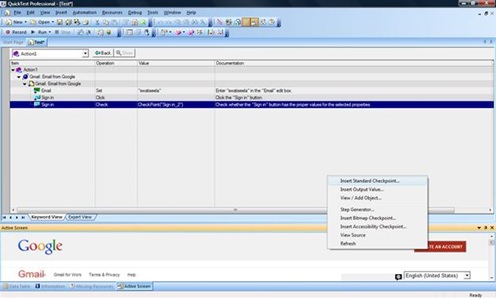
2) At any step in the QTP test, select the menu option “Insert->Checkpoint” and choose “Standard checkpoint”. Again follow the steps as above.
How the checkpoint properties can be accessed and modified
After creation, the user can modify a checkpoint as required. This can be done through the “Checkpoint properties” dialog box. This dialog can be accessed in the following ways:
1) While creating a checkpoint this box opens up for initial definition of the properties
2) Select an existing checkpoint statement in the Keyword view, right click and select “Checkpoint properties”
3) Open the Object repository and the properties are available there are shown below: (click to enlarge image)
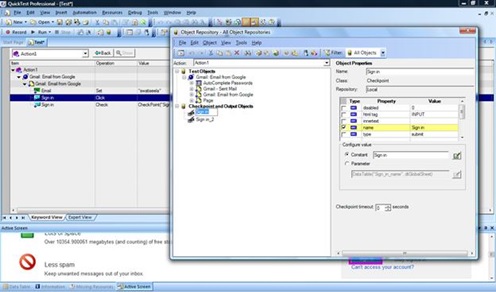
From this box, all the properties of a checkpoint can be modified as required.
Since the standard checkpoint is the first in our list I have provided the detailed steps of adding it in different scenarios and modifying it in different ways in detail. Moving forward I am going to list the properties and features that are unique for each checkpoint. It should be noted that the steps to add, use and manipulate the checkpoints are all the same for most of the checkpoints. From now on, unless specifically mentioned, the above approach can be used generically across the other ones too.
Since the standard checkpoint is the first in our list I have provided the detailed steps of adding it in different scenarios and modifying it in different ways in detail. Moving forward I am going to list the properties and features that are unique for each checkpoint. It should be noted that the steps to add, use and manipulate the checkpoints are all the same for most of the checkpoints. From now on, unless specifically mentioned, the above approach can be used generically across the other ones too.
 RSS Feed
