Checkpoints in UFT(Part 3) -Text Checkpoint ,Text Area Checkpoint.and Table Checkpoint.
4.Text Checkpoint
There will be many instances during the testing process when the text displayed in the AUT will have to be checked. ‘Text’ in this context refers to a text string.
One way of doing that is by using a standard checkpoint and checking the “text” property of an object. Let us give that a try. Again I will open the www.gmail.com and check the text that is displayed in the “Check Account” button or link.
I would choose to insert a standard checkpoint from the menu and set the following details:
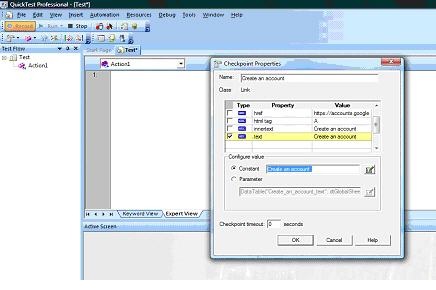
Let us look at each field in this dialog and understand what role each value we set in this dialog play in our checkpoint.
1) Name: by default a checkpoint’s name is the object’s name on which a checkpoint is placed. The user can change it if required.
2) Class: specifies the type of the object. This is non-editable.
3) Checkpoint summary: An understandable explanation of what this checkpoint does.
1) Name: by default a checkpoint’s name is the object’s name on which a checkpoint is placed. The user can change it if required.
2) Class: specifies the type of the object. This is non-editable.
3) Checkpoint summary: An understandable explanation of what this checkpoint does.
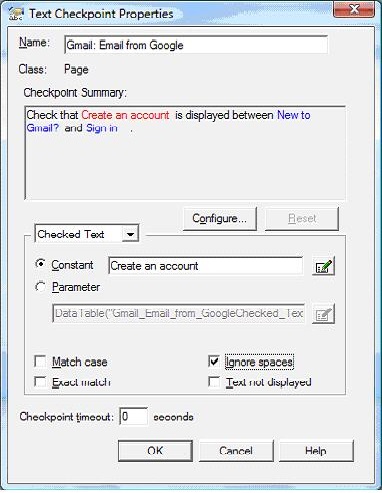
- For web applications it displays the text that is within the object in red. Refer to the dialog above.
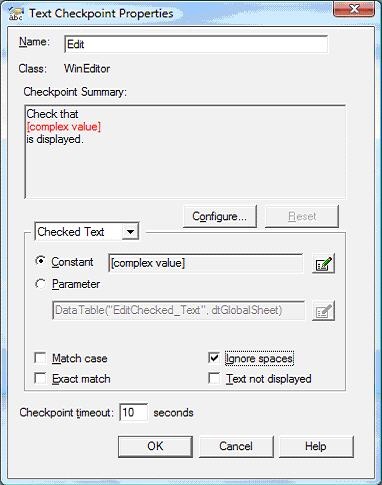
- For a windows application, it displays the text you selected while creating the checkpoint.
- Also for a windows application if you selected a text that is more than one line, then summary area displays [Complex value].
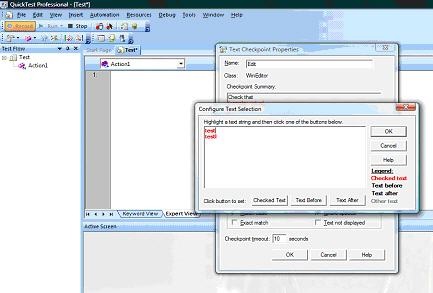
4) You can configure the text to specify what is the “Text before”, “Text after” and “Checked Text”.
For instance, if I need to see if ‘test’ appears in the notepad before ‘test1’ the same can be specified by clicking on the ‘Configure’ button above. The following dialog opens up:
For instance, if I need to see if ‘test’ appears in the notepad before ‘test1’ the same can be specified by clicking on the ‘Configure’ button above. The following dialog opens up:
5) The next options are to parameterize and to set the rules for comparison. They are pretty much self explanatory.
A checkpoint statement is inserted into the test once the user sets all the options and clicks OK:
5. Text area checkpoint:
6. Table checkpoint:
Let us look at an example:
I will pick a random site that has a web table. Open in internet explorer. Start recording, insert checkpoint->Standard checkpoint and choose the table object in the web page:
A checkpoint statement is inserted into the test once the user sets all the options and clicks OK:
- Text checkpoint can be added while recording, editing or from active screen.
- Once created, all the properties can be modified from the checkpoint properties window that can be accessed from keyword view, expert view or OR.
- Text checkpoint works in most of the environments unlike text area checkpoint that works only in a windows environment. We will get to it next.
- In case QTP cannot retrieve text directly from an object in cases when it is hand written stuff that is scanned and put as an image, it employs OCR to identify the text.
5. Text area checkpoint:
- This is used for windows applications.
- Compares a text string within a defined area according to the criteria specified.
- Defining the properties for this checkpoint is almost the same as that for a text checkpoint.
- The only dominant difference between Text checkpoint and a Text Area checkpoints apart from the environments, is that text checkpoint works on a certain object and text area works on a region selected.
- Though the menu option for text area checkpoint is available even while recording a web app, when chosen it is going to throw you an error that the web environment is unsupported for this checkpoint.
6. Table checkpoint:
- It can be used in cases when you need to verify that a particular cell in a table has a certain value or in some cases if the table itself has the defined number of rows of columns.
- When a web table or an equivalent table object is chosen to insert a checkpoint on, Table checkpoint properties get invoked.
- As a menu option, you choose “Standard Checkpoint” while recording. So the ground rules like creation, editing and maintaining are all the same.
Let us look at an example:
I will pick a random site that has a web table. Open in internet explorer. Start recording, insert checkpoint->Standard checkpoint and choose the table object in the web page:
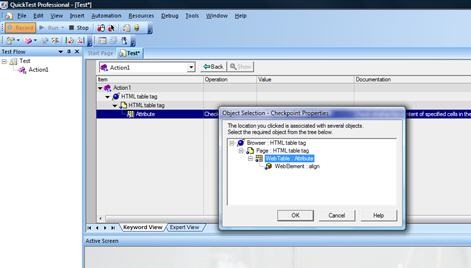
Select the Web Table element and click OK.
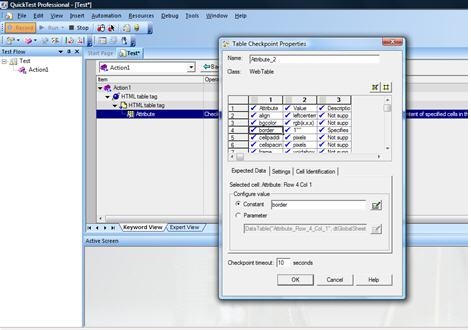
In the properties window, select the cell and specify if a constant value has to be there or parameterize.
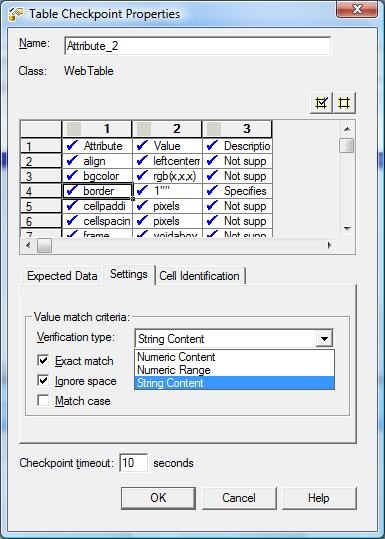
In the settings tab, the way in which the verification has to be carried out.
In the settings tab, the way in which the verification has to be carried out.
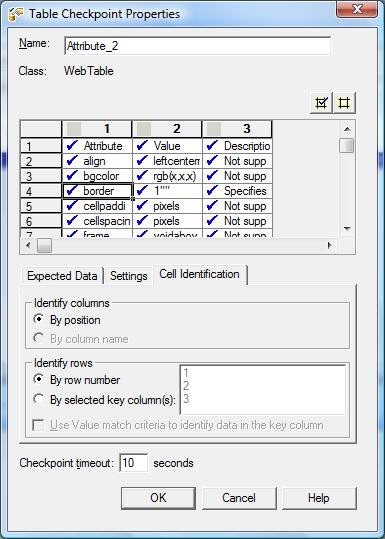
Cell identification, this tab is where the user has the settings to identify a particular row or column.
As I said earlier, since this is a variation of standard checkpoint all the same rules apply.
- Although, this in-built feature is available for checking tables I don’t find it very useful. There are other functions like GetRowCount, GetColumnCount, GetRowItem etc. to verify the tables. Let me explain that a little bit more before we move on.
- In practical scenarios checking just one cell might not suffice and creating a single checkpoint for each value in the table might get cumbersome. Eg: If a table is 3X3 then to check each cell, we will see 9 checkpoints. If the value in the second or first cell itself does not match, it does not signal an inconsistent table which kind of defeats the purpose and results in unnecessary continuation of checking the other cells.
- Instead by reading the table and using GetRowCount, GetColumnCount, GetRowItem functions you can establish a looping mechanism and check as needed and exit on failure. Only consideration for a tester at this point would be to make sure that he writes appropriate test results so that there is clarity.
- Also, table checkpoint fails in case of dynamic tables.
 RSS Feed
