Virtual Objects in UFT
Do you see Object not found error while running QTP tests? Well, this is because during playback QTP can’t recognize non-standard objects. To solve this object recognition problem we use Virtual Objects. Using Virtual Object Wizard we can map these unrecognized objects to standard class which then can be used as standard object to record the test.
How to solve object recolonization problem in QTP?
Example of Virtual Object:
Here is a scenario: I am recording a test on a Microsoft word document. I activate the already opened MS word doc and I click on any of the icons in the top menu. For example, I click on “Format Painter”. The code that gets recorded into QTP is:
Window("Microsoft Word").WinObject("NetUIHWND").Click 132,120
Window("Microsoft Word").WinObject("NetUIHWND").Click 672,101
In cases like this we would go for a virtual object. By definition, a virtual object is an object that is recognized by QTP as non-standard but is instructed explicitly by the tester to behave like a standard object.
Virtual Object Wizard Steps:
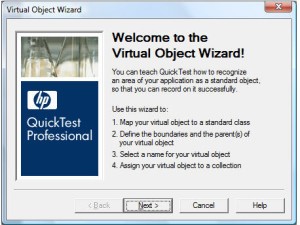
Step #1) Go to the menu option “Tools->Virtual Objects-> New Virtual Object” and click “Next” in the following window.
Before you hit “Next” take a minute the read what this wizard will do.
Do you see Object not found error while running QTP tests? Well, this is because during playback QTP can’t recognize non-standard objects. To solve this object recognition problem we use Virtual Objects. Using Virtual Object Wizard we can map these unrecognized objects to standard class which then can be used as standard object to record the test.
How to solve object recolonization problem in QTP?
Example of Virtual Object:
Here is a scenario: I am recording a test on a Microsoft word document. I activate the already opened MS word doc and I click on any of the icons in the top menu. For example, I click on “Format Painter”. The code that gets recorded into QTP is:
Window("Microsoft Word").WinObject("NetUIHWND").Click 132,120
Window("Microsoft Word").WinObject("NetUIHWND").Click 672,101
In cases like this we would go for a virtual object. By definition, a virtual object is an object that is recognized by QTP as non-standard but is instructed explicitly by the tester to behave like a standard object.
Virtual Object Wizard Steps:
Step #1) Go to the menu option “Tools->Virtual Objects-> New Virtual Object” and click “Next” in the following window.
Before you hit “Next” take a minute the read what this wizard will do.
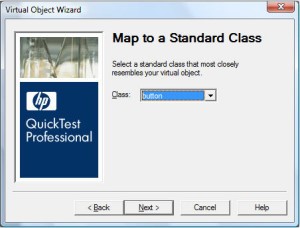
Step #2) Here you will find a list of classes. You can choose any class depending on how the object in your application is behaving like. In our case, the “Format Painter” Icon is more like a button. So I am going to choose “Button” from the list.
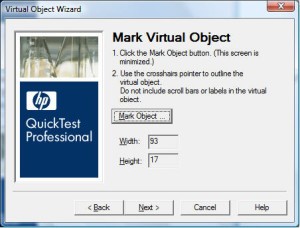
Step #3) In this screen you can mark the screen where the object is on your AUT. Click “Mark Object” and choose the object from your AUT.
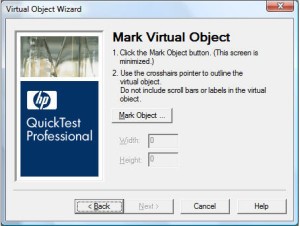
Step #4) The width and height values for the marked object will be populated once the selection is made. Hit “Next”
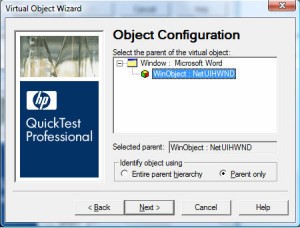
Step #5) You can now configure the way in which you would want the selected object to be recognized with reference to its parent. As you can see, you have a choice to see identify it based on its parent alone or the entire hierarchy. I am just going to keep the default values and click “Next”
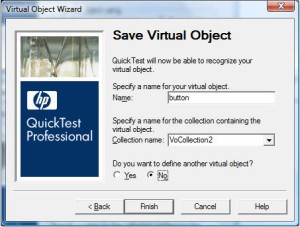
Step #6) Give your virtual object a name and add it to a collection (nothing but a consolidated list of Virtual objects). I keep the default values and click “Finish”
This completes the process for creation of a Virtual object.
Step #7) Go to “Tools->Virtual Objects->Virtual Object Manager”. Here you can see all the collections that are available and the objects within them.
Step #7) Go to “Tools->Virtual Objects->Virtual Object Manager”. Here you can see all the collections that are available and the objects within them.
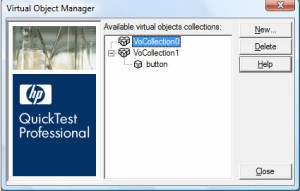
Clicking on “New” will take you back to the creation process that we have just seen. You can delete a collection using the “Delete” button.
Once you are done creating the virtual object, repeat the recording process on your AUT for the same object. This is how the code looks:
1
Window("Microsoft Word").WinObject("NetUIHWND").VirtualButton("button").Click
Now you will be able to perform all the operations on this VirtualButton that you can on a standard button object.
A few points to note:
1) This feature is not available for Analog and low level recording modes.
2) From the example you can see that the virtual object completely relies on the width and height factors, so it is not highly reliable.
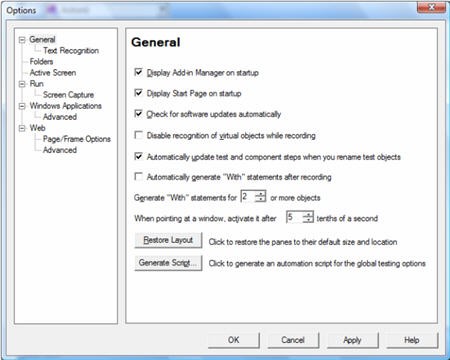
3) To disable QTP from recognizing the virtual objects while recording, choose the option “Disable recognition of virtual objects while recording’ under “Tools->Options->General”.
Once you are done creating the virtual object, repeat the recording process on your AUT for the same object. This is how the code looks:
1
Window("Microsoft Word").WinObject("NetUIHWND").VirtualButton("button").Click
Now you will be able to perform all the operations on this VirtualButton that you can on a standard button object.
A few points to note:
1) This feature is not available for Analog and low level recording modes.
2) From the example you can see that the virtual object completely relies on the width and height factors, so it is not highly reliable.
3) To disable QTP from recognizing the virtual objects while recording, choose the option “Disable recognition of virtual objects while recording’ under “Tools->Options->General”.
 RSS Feed
