Parameterization Methods in UFT
From this screen you can choose to parameterize the chosen value with either a value from the data table, environment variable or a random number. Since the most often used source is the datatable we will discuss that first.
Apart from these, you could use the input and output values of a certain action as a parameter for a value. We will discuss that too in a while.
1.Parameterization in UFT using Datatable with Example:- Parameterization in QTP using Excel
I checked the parameter value ON and then the there is a location in Datatable field following the name.
Name: The corresponding column name in the data table from where the data needs to be taken. By default QTP will suggest a name. You have an option to keep it as suggested or change it as needed.
Global Sheet: This sheet of data is available to all the actions in a test.
Current action sheet or local sheet: as the name suggests, it is the sheet of data that is available to a certain action.
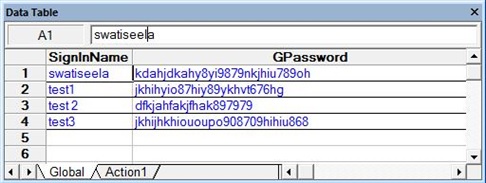
I am going to multiple rows of data to the Global data sheet. This is where the password encoder tool comes in handy. You can put in encrypted values in your data sheet that you get from this tool.
This is how my data sheet looks like:
Apart from these, you could use the input and output values of a certain action as a parameter for a value. We will discuss that too in a while.
1.Parameterization in UFT using Datatable with Example:- Parameterization in QTP using Excel
I checked the parameter value ON and then the there is a location in Datatable field following the name.
Name: The corresponding column name in the data table from where the data needs to be taken. By default QTP will suggest a name. You have an option to keep it as suggested or change it as needed.
Global Sheet: This sheet of data is available to all the actions in a test.
Current action sheet or local sheet: as the name suggests, it is the sheet of data that is available to a certain action.
I am going to multiple rows of data to the Global data sheet. This is where the password encoder tool comes in handy. You can put in encrypted values in your data sheet that you get from this tool.
This is how my data sheet looks like:
After parameterization this is how the code looks like:
SystemUtil.Run "iexplore.exe", http://www.gmail.com
Browser("Gmail: Email from Google").page("Gmail: Email from Google").Sync
Browser("Gmail: Email from Google").page("Gmail: Email from Google").WebEdit("Email").Set DataTable("SignInName", dtGlobalSheet)
Browser("Gmail: Email from Google").page("Gmail: Email from Google").WebEdit("Passwd").SetSecure DataTable("GPassword", dtGlobalSheet)
Browser("Gmail: Email from Google").page("Gmail: Email from Google").WebButton("Sign in").Click
Browser("Gmail: Email from Google").Page("Gmail - Inbox").Link("Sign out").Click
Browser("Gmail: Email from Google").page("Gmail: Email from Google").Sync
Browser("Gmail: Email from Google").Close
You will see in the above code that the values for the email ID and password are taken from datatable.
This code will run for all the 4 rows of data in the global sheet if in the following screen I set the option “Run on all rows” ON:
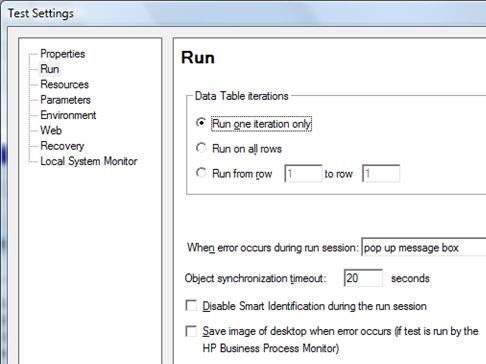
Just in case, if you don’t want to use the above screen to decide how many rows the code needs to be executed for you can do so programmatically. For that, you need to select the option “Run one iteration only” on the above screen and write the code the following way:-
For i=1 to datatable.GetRowCount
SystemUtil.Run "iexplore.exe", http://www.gmail.com
Browser("Gmail: Email from Google").page("Gmail: Email from Google").Sync
datatable.SetCurrentRow(i)
varName=datatable.value("SignInName")
varPwd=datatable.Value("GPassword")
Browser("Gmail: Email from Google").page("Gmail: Email from Google").WebEdit("Email").Set varName Browser("Gmail: Email from Google").page("Gmail: Email from Google").WebEdit("Passwd").SetSecure varPwd
Browser("Gmail: Email from Google").page("Gmail: Email from Google").WebButton("Sign in").Click
Browser("Gmail: Email from Google").Page("Gmail - Inbox").Link("Sign out").Click
Browser("Gmail: Email from Google").page("Gmail: Email from Google").Sync
Browser("Gmail: Email from Google").Close
Next
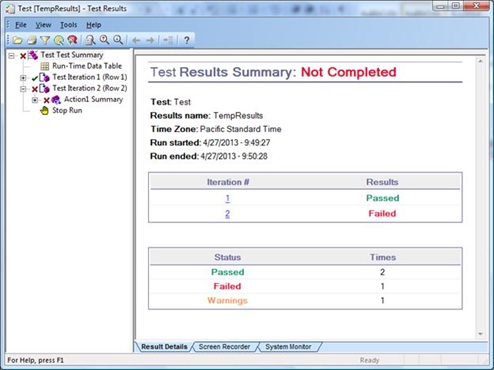
On executing a test that runs for 2 iterations this is how the test results screen will look like:
For i=1 to datatable.GetRowCount
SystemUtil.Run "iexplore.exe", http://www.gmail.com
Browser("Gmail: Email from Google").page("Gmail: Email from Google").Sync
datatable.SetCurrentRow(i)
varName=datatable.value("SignInName")
varPwd=datatable.Value("GPassword")
Browser("Gmail: Email from Google").page("Gmail: Email from Google").WebEdit("Email").Set varName Browser("Gmail: Email from Google").page("Gmail: Email from Google").WebEdit("Passwd").SetSecure varPwd
Browser("Gmail: Email from Google").page("Gmail: Email from Google").WebButton("Sign in").Click
Browser("Gmail: Email from Google").Page("Gmail - Inbox").Link("Sign out").Click
Browser("Gmail: Email from Google").page("Gmail: Email from Google").Sync
Browser("Gmail: Email from Google").Close
Next
On executing a test that runs for 2 iterations this is how the test results screen will look like:
I would like to spend some time on examining the code and trying to understand why each line and its order is important for the successful execution of the test:
State of your AUT:
The basic rule is – Each iteration should begin with the AUT being the same state and ending in the same state.
The following is the piece of code when you are using a local sheet instead of the global:
Browser("Gmail: Email from Google").page("Gmail: Email from Google").WebEdit("Email").Set DataTable("Name", dtLocalSheet)
Browser("Gmail: Email from Google").page("Gmail: Email from Google").WebEdit("Passwd").SetSecure DataTable("Pwd", dtLocalSheet)
Browser("Gmail: Email from Google").page("Gmail: Email from Google").WebButton("Sign in").Click
2. Parameterization in QTP using Random Number:- If a certain field needs to have any number within a certain range you can specify the same using QTP. In the Value configuration properties screen, select “Random number” and the following options come up:
- Why am I opening the browser within the ‘for’ loop?
- Why are there sync statements everywhere?
- Why are we programmatically closing the browser at the end instead of letting the “Record and run settings – Close the browser when test closes” option take care of that for us?
- Again, why is the close statement inside the ‘for’ loop?
State of your AUT:
The basic rule is – Each iteration should begin with the AUT being the same state and ending in the same state.
- If the statement to open the gmail.com page was outside the for loop, the test would run fine for the first iteration but for the next one the gmail.com page would not have been opened and the test would fail.
- If the statement to close the browser is not included in the test, then the test would open a browser with each iteration and you would end up with having as many instances of the browser open as the number of rows in the datatable.
- Imagine if the close statement was outside the for loop, then also you will end up with too many browsers.
- Sync statement: this forces the QTP test to wait until a certain page loads up completely before it starts performing a certain operation on it.
The following is the piece of code when you are using a local sheet instead of the global:
Browser("Gmail: Email from Google").page("Gmail: Email from Google").WebEdit("Email").Set DataTable("Name", dtLocalSheet)
Browser("Gmail: Email from Google").page("Gmail: Email from Google").WebEdit("Passwd").SetSecure DataTable("Pwd", dtLocalSheet)
Browser("Gmail: Email from Google").page("Gmail: Email from Google").WebButton("Sign in").Click
2. Parameterization in QTP using Random Number:- If a certain field needs to have any number within a certain range you can specify the same using QTP. In the Value configuration properties screen, select “Random number” and the following options come up:
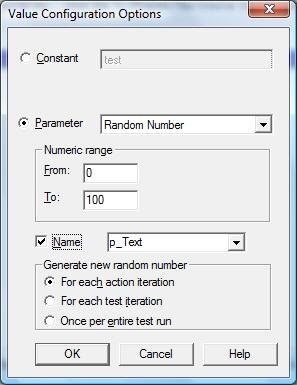
As you can see, the options are pretty self explanatory. The range can be set and how many times during a particular iteration run or a test run should this value be generated can be programmed here.
Let us just keep the default settings and click OK and see the line of code that gets inserted.
Browser("Google").Page("Google").WebEdit("q").Set RandomNumber("p_Text")
In real time, this is a very useful feature that can help the tester automate the scenarios in which the numeric range of data needs to be verified.
3. QTP Parameterization using Environment Variables:- Environment variable is a value that remains the same throughout a test run unless explicitly changed by the program.
Types of environment variables:
Built in variables are created by QTP itself and contain information about the test path, operation system etc. These are read only and hence can only be used by the user as they are.
Some examples are TestIteration, OS, OSVersion etc. The usage is similar to the usage of any other variable. For example in the second iteration of a test you want to display a custom message, this is how you can do it:
If TestIteration=2
Msgbox “Cusotm message: Take a break!”
<….Code….>
End if
Next, let us try to parameterize a certain value with an environment variable.
Let us just keep the default settings and click OK and see the line of code that gets inserted.
Browser("Google").Page("Google").WebEdit("q").Set RandomNumber("p_Text")
In real time, this is a very useful feature that can help the tester automate the scenarios in which the numeric range of data needs to be verified.
3. QTP Parameterization using Environment Variables:- Environment variable is a value that remains the same throughout a test run unless explicitly changed by the program.
Types of environment variables:
- User defined internal
- User defined external
- Built in
Built in variables are created by QTP itself and contain information about the test path, operation system etc. These are read only and hence can only be used by the user as they are.
Some examples are TestIteration, OS, OSVersion etc. The usage is similar to the usage of any other variable. For example in the second iteration of a test you want to display a custom message, this is how you can do it:
If TestIteration=2
Msgbox “Cusotm message: Take a break!”
<….Code….>
End if
Next, let us try to parameterize a certain value with an environment variable.

From the above screen, you can see that the type is read only and we are only able to create a user defined- internal environment variable.
Click on the “Name” Drop down box:
Click on the “Name” Drop down box:
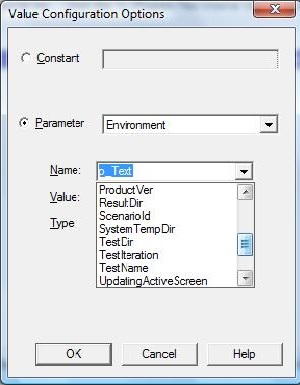
Even though we have not created any environment variables in this test so far there are many of them available in the drop down to be used.
Select any one of them:
Select any one of them:
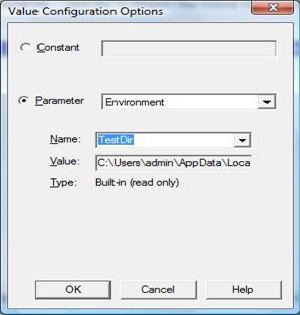
It shows that the variable is a built-in and read only. So this shows how we can use a built in variable.
But if we need a new one, enter a new name, say PV assign 0 and save it:
But if we need a new one, enter a new name, say PV assign 0 and save it:
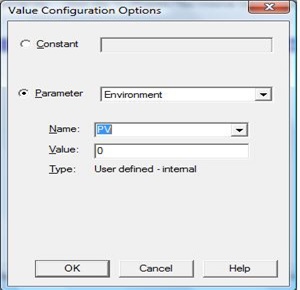
Let us first accept the default values and enter a “0” in the value field and click OK. The following is the line of code that gets inserted:
Browser("Google").Page("Google").WebEdit("q").Set Environment("PV")
Since we inserted an E.V. it is obvious that the value of PV is going to be 0 throughout the test. The next time you are trying to parameterize anything else with an environment variable within the test this one will be available in the list.
User defined – external: In case when we need to have an entire list of environment variables available for a test, the user has an option to create it externally and associate it to the test and make those variable available to this test.
Typically, this file is an .xml with the structure as follow and is available on your desktop:
<Environment>
<Variable>
<Name>First Name</Name>
<Value>Swati</Value>
</Variable>
<Variable>
<Name>Last Name</Name>
<Value>Seela</Value>
</Variable>
</Environment>
Once this is set, we can add this file to the test by going to “File->Settings->Environment” and selecting “User defined” from the drop down:
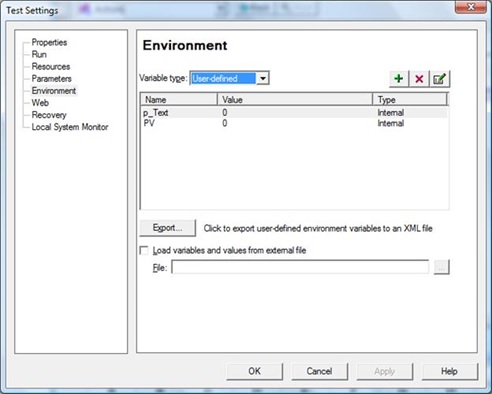
In the screen, you can see the option to add the file, so ahead and add it.
Alternately, if I need the variables in this test for another one, I can export them into a file by clicking on “Export” option.
So now that we know how to set and use environment variables, there is yet another use for these:
In case, we set the values for URL_env and Browser_env variables, then the record and run settings set overrun and no matter what you set there, it is going to consider the values that these variables contain.
4.QTP Parameterization using Action and Test Parameters:- We know that a test in QTP but a call to an action. Input parameters for an action or test are nothing but the values that get supplied to them from elsewhere in the test.
They could be:
The way these can be used to parameterize is as follows:
These can be used as a parameter by using the “Parameter” keyword.
If this is the statement that you need to parameterize so that the value you set is not a constant “swati” but a value that is the input value of an action that is already defined, say “OPFirstName”:
Browser("Gmail: Email from Google").Page("GoogleAccounts").WebEdit("FirstName").Set "swati”
This is how it is done:
Browser("Gmail:Email from Google").Page("GoogleAccounts").WebEdit("FirstName").Set
Parameter(“OPFirstName”)
Also, if there is a output parameter that is already defined then you could also write something like:
Parameter("TotalValue") = Browser("Gmail: Email from Google").Page("GoogleAccounts").WebEdit("FirstName")
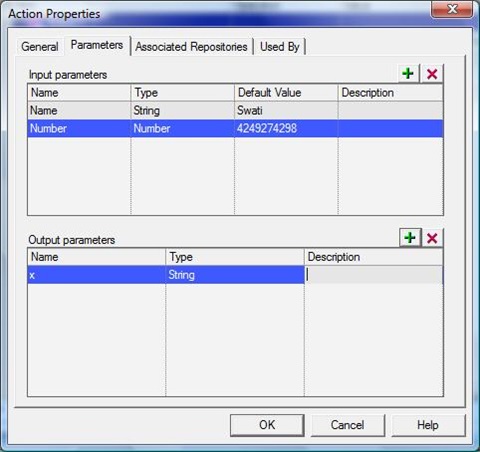
Now let us see, how the i/p or o/p parameters can be set in the first place. Let’s start with an action.
You can define, modify, and delete input and output parameters in the Parameters tab of the Action Properties dialog box (Edit > Action > Action Properties or right-click an action and select Action Properties).
Alternately, if I need the variables in this test for another one, I can export them into a file by clicking on “Export” option.
So now that we know how to set and use environment variables, there is yet another use for these:
In case, we set the values for URL_env and Browser_env variables, then the record and run settings set overrun and no matter what you set there, it is going to consider the values that these variables contain.
4.QTP Parameterization using Action and Test Parameters:- We know that a test in QTP but a call to an action. Input parameters for an action or test are nothing but the values that get supplied to them from elsewhere in the test.
They could be:
- Value(s) passed on while calling that action
- Return value of another action (Output parameters)
- A value that it gets from some top level action
The way these can be used to parameterize is as follows:
These can be used as a parameter by using the “Parameter” keyword.
If this is the statement that you need to parameterize so that the value you set is not a constant “swati” but a value that is the input value of an action that is already defined, say “OPFirstName”:
Browser("Gmail: Email from Google").Page("GoogleAccounts").WebEdit("FirstName").Set "swati”
This is how it is done:
Browser("Gmail:Email from Google").Page("GoogleAccounts").WebEdit("FirstName").Set
Parameter(“OPFirstName”)
Also, if there is a output parameter that is already defined then you could also write something like:
Parameter("TotalValue") = Browser("Gmail: Email from Google").Page("GoogleAccounts").WebEdit("FirstName")
Now let us see, how the i/p or o/p parameters can be set in the first place. Let’s start with an action.
You can define, modify, and delete input and output parameters in the Parameters tab of the Action Properties dialog box (Edit > Action > Action Properties or right-click an action and select Action Properties).
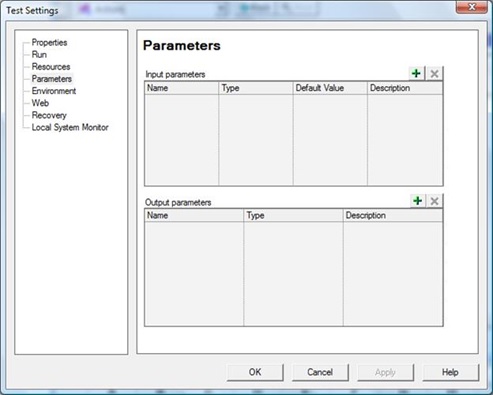
Similarly, for the test, the parameters can be set:
So, to call an action with the input parameters this is the statement that needs to be used:
RunAction ActionName, IterationQuantity, Parameters
RunAction ActionName, IterationQuantity, Parameters
 RSS Feed
